|
|
|
Who's Online
There currently are 6043 guests online. |
|
Categories
|
|
Information
|
|
Featured Product
|
|
|
 |
|
|
There are currently no product reviews.
 ;
Manuals were delivered promptly and were correct as advertised. No issues with the download link which was provided promptly after everything was processed. Very pleasant experience
;
Paid for service manual & got the download fast - worth a visit if you need a service manual
;
It's the manual, I am searching for. Now I am able to repair my Braun A501.
 ;
Great service manual. Unfortunately on page no. 41 there are some details which i can't read.
;
Wonderful service... doubt that I could have made the repairs to my turntable without this service manual. Great help!
Well worth the price paid!
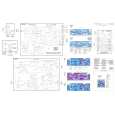
D
Demontage
GB
Disassembly
Demontageschritte Disassembly steps
Entfernen, entriegeln, abziehen Remove, unlock, disconnect
Bemerkungen Remarks
Fig. Fig.
Frontblende (F), Front Panel (F)
Release Panel Release Panel
abnehmen remove
Schrauben (2xE) Screws (2xE)
abschrauben unscrew
1
Feder (2xD) Spring (2xD)
entfernen remove
1
Rahmen (B) Frame (B)
Rahmen vorsichtig abziehen. Carefully remove the Frame.
1+2
Schrauben (4xG) Screws (4xG)
abschrauben unscrew
2
Frontblende (F) Front panel (F)
Frontblende vorsichtig abziehen. Carefully remove the front panel.
Laufwerk (C), Mechanism (C) (ADC 1400 + TN 705)
Schrauben (4xA) Screws (4xA)
abschrauben unscrew
3
X 1110 + X 1302 X 1110 + X 1302
vorsichtig abziehen carefully unplug
3
Laufwerk (C) Mechanism (C)
Laufwerk vorsichtig nach oben abheben. Carefully lift out the mechanism.
3
Laufwerk (K), Mechanism (K) (TN 708)
Schrauben (4xA) Screws (4xA)
abschrauben unscrew
4
Laufwerk (K) Mechanism (K)
Laufwerk vorsichtig nach oben abheben. Carefully lift out the mechanism.
4
X 1301 X 1301
vorsichtig abziehen carefully unplug
5
-6-
|
|
|
> |
|