|
|
|
Who's Online
There currently are 6043 guests online. |
|
Categories
|
|
Information
|
|
Featured Product
|
|
|
 |
|
|
There are currently no product reviews.
 ;
available for me the service manual is in order!
thanks
 ;
This is exactly the thing you need to service this box. The manual is complete and the quality of the scan is good. I recommend this!
;
The delivery of this manual was very fast, less than 8 hours. The manual is very clear and concise, and helped a great deal in the repair and final setup of the Hitachi HMA-G2 Amplifier.
;
Great service. The manual was exactly what I was looking for: schematic + layout. I managed to fix the player. Highly recommended!
;
At $5,00 certainly good bang for your buck. Includes electric schematics as well as exploded parts view + parts list for reordering. Unfortunately no details on the PCB contents or working, but then again, this is not overly complex. Best bonus: this manual does contain the heavily searched for LED error codes as well as descriptions for test operation. Haven't gotten around to fixing the machine yet, one thing the manual won't do for you is getting it out of the kitchen assembly :-(
D
Voreinstellungen / Abgleichhinweise
GB
Pre-adjustments / alignment instructions
Ausstattung des Arbeitsplatzes
Netzgerät 12 V regelbar, 10 A Me�sender (z.B. Meguro, Leader, Kenwood) Hochohmiges Voltmeter Ri > 10 M� Outputmeter; Frequenzzähler; NF-Millivoltmeter; Stereocoder Oszilloskop: - Empfindlichkeit: 5 mV bis 50 Volt/cm. - Bandbreite: Gleichspannung bis 50 MHz. - Tastköpfe 10:1 und 1:1 - Schraubendreher / Abgleichstifte (keramisch) - Lötstation -
Workbench equipment
Power adapter 12 volts adjustable, 10 A Signal generator (Meguro, Leader, Kenwood) High impedance voltmeter Ri > 10 M� Output meter; frequency counter; AF millivoltmeter; stereo encoder Oscilloscope: - inp. sensitivity: 5 mV to 50 volts per division - bandwidth: d.c. to 50 MHz - Probes 10:1 and 1:1 - Screwdriver / alignment pins (ceramic) - Soldering station
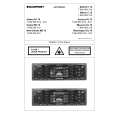
Vorbereitende Arbeiten
Bevor Sie den elektrischen Abgleich durchführen, müssen Sie Sharx ausschalten: 1. Drücken Sie die Taste "MENU". 2. Betätigen Sie die Taste oder bis im Display "SHARX" angezeigt wird. 3. Drücken Sie die Taste < oder > bis im Display "NO SHARX " erscheint.
Preparatory steps
Switch off Sharx before performing the electrical alignment:
1. Press the "MENU" key. 2. Press the key or until �"SHARX"appears in the display. 3. Press < or > until "NO SHARX " appears in the display.
Lautsprecheranschlu� Der Lautsprecherausgang mu� mit 4 � abgeschlossen sein.
Loudspeaker connections The loudspeaker output must be terminated with 4 �.
Abgleichhinweise
Wellenbereich: FM = 87,5 MHz - 108 MHz (100 kHz automatische Suchlaufschritte) (50 kHz manuelle Suchlaufschritte)
Notes on alignment
Wavebands: FM = 87.5 MHz - 108 MHz (100 kHz automatic tuning steps) (50 kHz manual tuning steps)
MW = 531 kHz - 1602 kHz (9 kHz automatische Suchlaufschritte) (9 kHz manuelle Suchlaufschritte) LW = 153 kHz - 279 kHz (9 kHz automatische Suchlaufschritte) (1 kHz manuelle Suchlaufschritte)
MW = 531 kHz - 1602 kHz (9 kHz automatic tuning steps) (9 kHz manual tuning steps) LW = 153 kHz - 279 kHz (9 kHz automatic tuning steps) (1 kHz manual tuning steps)
AM + FM - Abgleich - Den AM- und FM-Abgleich müssen Sie durchführen, wenn bei einer Reparatur frequenzbestimmende Bauteile ausgetauscht oder verstellt wurden. - Nach Reparatur- bzw. Abgleicharbeiten müssen die Geräteparameter neu programmiert werden. Für den Abgleich müssen Sie die Stationstasten mit folgenden Frequenzen programmieren: Taste FM1 MHz MW kHz 1 97,1 900 2 3 4 5 6
AM + FM alignment - The AM and FM alignment has to be carried out if components that determine the circuit's frequency have been replaced or distuned. - After a repair or alignment job make sure to reprogram the basic product parameters. For the alignment you must store the following frequencies on the station presets : Preset FM1 MHz MW kHz 1 97.1 900 2 3 4 5 6
Abschirmung Der HF-Abgleich mu� mit Unterdeckel erfolgen.
Radio shielding The RF alignment has to be performed with the bottom cover in place. Required after replacement of D1/D810: - Alignment of front-end and intermediate circuit - Programming the FM reference field strength - Programming the AM reference field strength
Nach dem Auswechseln von D1/D810 erforderlich: - Abgleich des Vor- und Zwischenkreises - Programmierung der Bezugsfeldstärke für FM - Programmierung der Bezugsfeldstärke für AM
-6-
|
|
|
> |
|